If you’ve got a camera trap, there’s a strong chance you’re going to have it out in the rain at some point (especially if in the UK). But what about when its seriously wet, or you’ve by a river or stream? Or if you’re after some exotic creature in the tropics?
Here, we’ll look at the issues excessive moisture can cause, and how to mitigate against the wet stuff.
Most importantly, all our camera traps are weatherproof – they can put up with any kind of weather including rain, storms, snow etc. However, there are steps you can take to improve your camera’s longevity if you’re in a particularly wet part of the UK or camera trapping in rainforests – where the humidity is always very high.
In certain seasons, rainforests can receive up to a metre of rain in just one month – an amount that few electronic goods will be able to withstand. But by choosing the right trail camera, and doing the right things with it in the field, you can mitigate any issues.
Firstly, in the UK and most of the temperate countries in the world in normal situations, you don’t need to do anything special with your camera trap when the rain is falling. They are tried and tested to withstand this. You don’t need a roof, or to put it in a bird box, or to bring it inside in nasty weather. It’s ready for all of that; no problem.
However, when you’re camera trapping in really damp locations – for example in dense pine plantations or in the rainforests, or camera trapping by running water, there are a couple of things worth considering…
Some animals are more used to the rain than others…
Before you’ve even got your trail camera make sure it has a robust case, with fewer points of entry for moisture. Browning, Bushnell and Reconyx camera traps are well-suited for this.
Screw holes on the back are nothing to worry about and all the cameras have internal gaskets to keep moisture out.
If a camera has a DC plug on the base, make sure that’s fully closed when deployed.
One of the most important steps is to have the camera door open or battery tray out for as short a period of time as possible. That way, you reduce the amount of atmospheric moisture that can get in the camera. Open the door, do what you need, then close it again.
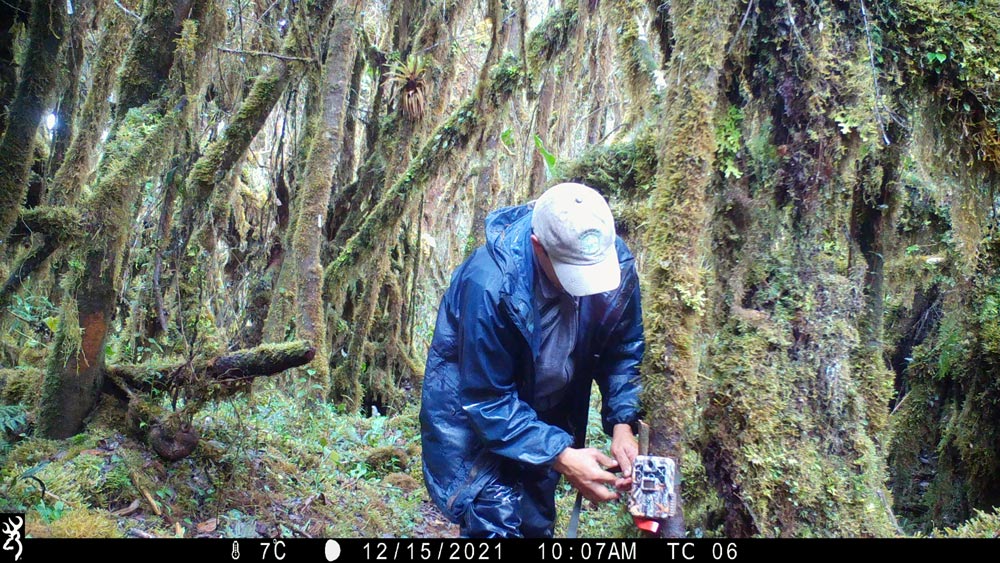
A (waterproof) ranger in Ecuador checks a trail camera in the cloud rainforest (Photo; Rainforest Concern)
In rainforests, an additional step is often a good idea – desiccant. These come either as small packets – often found in with a pair of new shoes, or clothing – or as sheets. They draw moisture to them, and away from anything else. This helps with preventing mould growth and keeping moisture away from the internal electrics of the trail camera. Reconyx for example sell desiccant sheets exactly for this reason.
In wet places, vegetation often grows quickly in Spring and Summer. A site that is nice and clear may be completely overgrown when you come back to your trail camera. This is especially true in rainforests.
Providing there are no sensitive species on site, and only if you need to, trim vegetation in the area in front of the camera – for example nipping any early bracken or bramble growth back. Alternatively, look for areas to place your camera that will remain clear – i.e. on animal trails. Generally, animals won’t walk through scrubby vegetation so always best to avoid areas like this.
Some battery types will be much better than others in these conditions. Alkaline batteries can be particularly problematic – they sweat or leak acid, which then shorts the camera trap and often, irreparably damages them. In wet conditions, always use either Lithium or rechargeable (if the trail camera allows).
Take a look at our other help articles on batteries and camera traps to help decide what will best suit your needs.
Best batteries for camera traps
Using rechargeable batteries for camera traps
Generally, if camera trapping in wet locations, its often the case that they are also quite dark or shady places – i.e. forests with dense canopies or vegetation. That presents a different challenge to the moisture itself.
It can mean the trail camera you’re using never gets enough sunlight to switch to colour mode, and stays in black and white mode regardless of the time of day. We see this more often in the dense pine forests whilst looking for pine marten in Yorkshire, and from customers using trail cameras in the tropics.
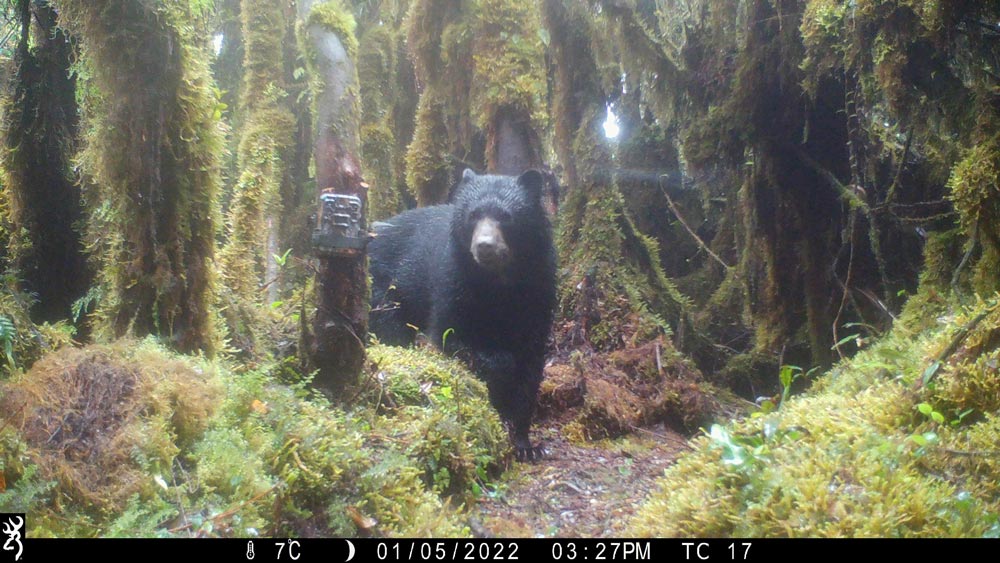
A soggy Andean bear in Ecuador – the moss on the trees gives an idea of how wet these forests are! (Photo; Rainforest Concern)
It’s very difficult to avoid this – camera traps don’t have settings to force them to daylight or night mode, and rely on the onboard light sensor to do this. You can test the trail camera before leaving it in place to see if it triggers in daylight or night mode, or try and find spots that are a little clearer.
This isn’t a very common issue, but certainly happens – bugs and insects taking up residence in a trail camera. It’s always worse on cameras with lots of crevices or holes – older Bushnell Aggressor cameras used to be particularly bad for this, but current models are a lot better.
It can be worse in cameras in wet places, and especially in rainforests as you might expect! It could be earwigs, spiders, slugs – we’ve even seen large caterpillars inside cameras we’ve repaired from customers in the rainforests.
The latter was possible due to other damage the camera had suffered, but it’s difficult to stop bugs externally. Visiting the trail camera more often can help, but also disturbs the site more so isn’t ideal for more sensitive locations.
Apart from the wet stuff that falls from the sky, there is another source of risking a wet camera – rivers, streams, brooks, burns, becks etc. These can be fantastic spots for camera trapping – biological corridors that attract an array of different species, and of course some specialised animals that live their lives on them. Otters are often an irresistible draw for any trail camera user, if the opportunity presents itself!
The important thing to note first is that camera traps are weatherproof, not waterproof. Even any camera purporting to be waterproof (which is worth being suspicious of) will likely only be so for a maximum of 30 minutes, up to a depth of 1m, and probably not in muddy, running water. So – keeping your camera trap out of the stream is pretty important if you want to use it again.
The water would come from the bottom obviously – so making sure any DC plugs are fully closed is, as always, vital. That said, if the water does come up and above the bottom of your trail camera, it’ll likely be toast. We’ve certainly seen camera traps survive submergence in streams (and the resulting recordings!) but its rare and definitely the exception.
There are a few things to look for initially. Firstly, camera traps generally don’t trigger for something under the water’s surface, or just poking out – therefore it’s always best to set the camera trap up looking at banks, or small beaches or rocky areas. These are often the places where wildlife will stop by too – otters, mink, dippers etc. Otters will also leave spraint as territory markers which they often revisit – handy hints for camera trappers.
Sometimes being just off the stream gives better results, whilst keeping your trail camera safer (video from the Yorkshire Pine Marten Project)
The season plays a big role too – if its Summer you’ve likely go no reason to worry – but in pretty much any other season, things can change pretty quickly (in the UK!). It can sometimes take just an hour or two for the levels of streams to rise enough to start touching your camera, likely too soon for you to react and grab it before its too late.
The banks of streams and rivers can give away tell-tale signs. A layer of debris is often present on the sides – this is the high water line. Its not a given that it won’t go past this point (especially in this day and age), but its a very good indication. You can use this hint from the landscape to your advantage by placing the camera trap just above this point. That means you can get as close as you need, and also that there would have to be a huge amount of rainfall in order for your camera to be impacted.
Finally, you can instead attach the trail camera to a tree higher up, and point the camera down towards the target area. This isn’t ideal in terms of capturing what you want as it creates a small detection area, but it can mean the camera is much less likely to go swimming!
Camera trapping in wet, moist, rainy conditions might sound miserable for us humans – but it can give some great wildlife results. The main things to bear in mind are whether your camera trap is fundamentally suitable, keeping everything closed as much as possible, considering desiccant, using the right batteries and keeping away from any high water lines.
If you do all that, then you should be able to focus just on the wildlife.